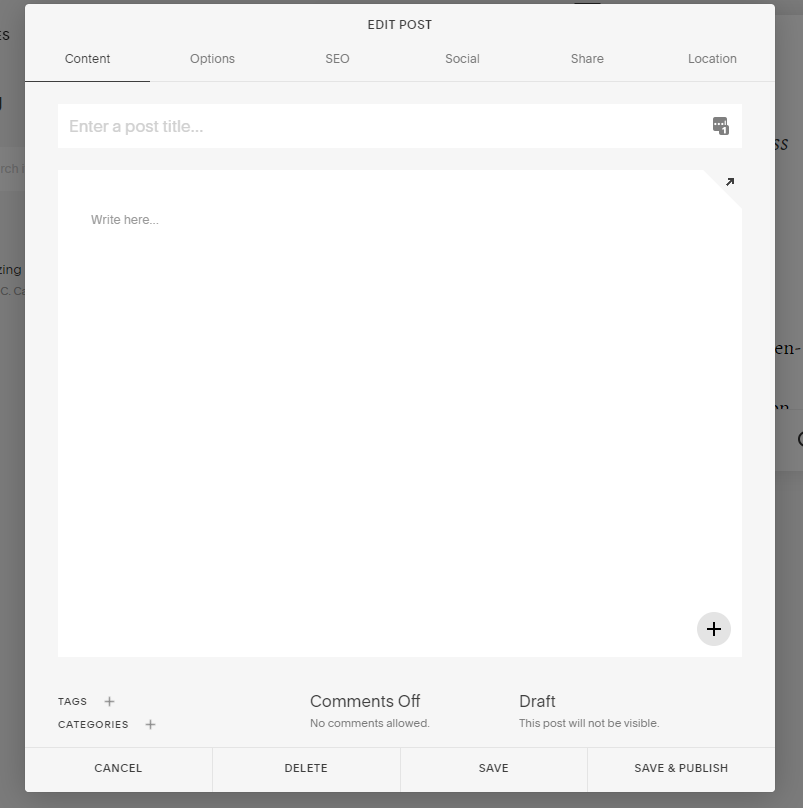
What You Need to Know About Posting Your First Blog on Squarespace
When I wrote my first blog, I was so excited. I had finally committed words to paper, and I wanted to get that baby out into the world.
All I had to do was copy, paste, and hit the publish button. Easy, right?
Not exactly.
I soon learned that writing was a portion of the work. There was the other side: formatting, organizing, and imagery, to name a few.
So I put together this handy guide to help you consider what you need to do after you’ve written your blog so you can publish it like a pro and not lose too much of your time (like I did!).
Just a note, I use Squarespace as my publishing platform. However, many of these issues/choices are modifiable for other platforms – WordPress, Wix, Weebly – since most of the basic features are the same.
Let’s get started!
Set up a blog template that tracks key information
This may seem simple, but having a template that lays out all the basic information you need to consider before you write will not only save time, but keep you from missing anything important.
For instance, in your blog template, you may want a space that includes the category you want the post to go under, the tags you want to use, what the URL of the blog will be, and the date published. Think also about adding in a space for the topic, working title(s), subtitle(s), audience, and keywords.
Here’s what my template looks like:
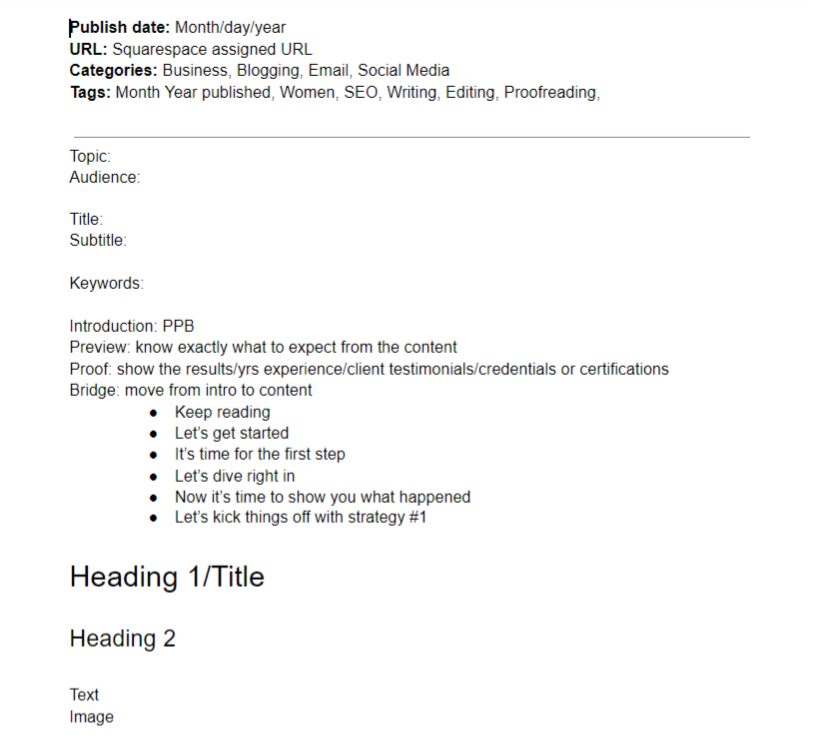
Having this information right on the document will help you stay organized and make sure you consider all parts of the blog post.
What are categories and tags?
As I was getting my first blog post setup, I came across empty categories and tags. Um, I have to figure this part out also?
Yes, yes, I did.
The categories are the broad topics you’ll want to organize your blog posts under. Some sites will automatically put it under a month/year category, but I would encourage you to have a few others as well.
And the reason for that is searchability.
What will your audience want to search under? How will they find more information on the same topic? The answers to these questions should be your categories.
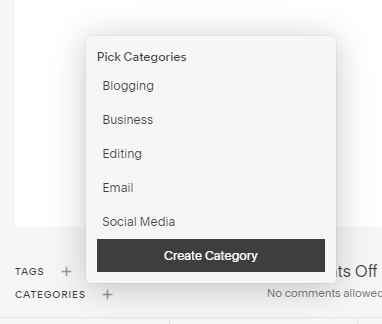
As for tags, these are a finer way to filter through the categories. Create as many tags as you think will be helpful to your audience to find what they are looking for.
I know this seems simple, but when it’s not something you’ve even considered, to have this roadblock pop up when you want to publish is annoying. So get it figured out on a basic level, and you won’t have to worry about it every single time you post.
Pro tip: Add these items to your blog template. Now all you do is look it over, delete what you won’t be using, and click, click, click on your blog platform using the template as your guide.
Formatting your blog – It isn’t just copy + paste
This is the one area that irritates me the most.
I like to write my blog posts in Google Docs and transfer them to the blogging platform. Should be simple, right?
Nope! When you copy and paste into Squarespace, the formatting gets all wonky.
Now I could copy it over as plain text (and you should if you are worried about weird codes copying into your blog post), but then I’d lose all my formatting. Gasp!
Maybe it’s different on other platforms – and if it is, skip this part.
Now the easy fix would be to write the blog on the actual platform’s word processing page.
Sure, but I don’t like to do that. I don’t like how it looks on the page. It may seem strange, but I need to see it a certain way – I’m a visual writer in that way.
The best thing you can do is to format your document in whatever word processing platform you like to use. And then, when you copy it over to your site, use it as a guide to reformat your post.
Now, is this a great solution? No. But as the Japanese say, Shikata (ga) nai, which roughly translates to “It can’t be helped.”
As you go through and format your blog, always check your links and make sure that if they are external links, they open to another window. If they’re internal links, they open to the same page.
Oh, and when you do format in Google Docs or whatever word processing program you use, don’t bother getting fancy with the placement and sizing of your images. You’ll find you’ll need to resize and move the images after placing them on the blogging platform.
Now I’m not saying, don’t figure out where you want your images or what you want your images to be. That is always helpful. Just don’t do extra work that doesn’t save you time.
And if you’ve discovered a workaround for this, drop me a comment or send me an email. I am willing to learn new ways of doing things.
Now you need to style your blog
Here’s something else you'll have to decide on: how to style your posts.
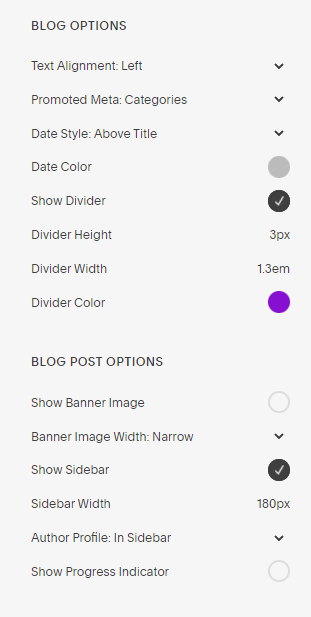
Please note, the options may be different depending on the template you use.
Every platform has different features of how your blog posts will look on the page. In Squarespace, the template will decide most of that, but you still have some choices you can make.
For instance, where do you want the banner image to go? How big will it be? How do you want the headline or title to display? Where do you want the date to go or look like?
Additionally, make sure whatever styling and branding choices you made on your other pages show up on your blog page.
One thing to consider for your blog is having a sidebar. This can have your picture, a short blurb about you, and images or links to more content on your site. If you do, be prepared to write some extra content and style this aspect of your page.
And don’t be like me: Decide to delete your sidebar from your blog template, then decide you want it... and have to spend a bunch of time figuring out how to get it back without screwing everything up.
Creating the main image
In this age of Pinterest, having a main image is super important.
Why? Because you need something compelling that will draw people to your post by looking at the image.
When you’re picture hunting, decide which of the images will be your main one. This is the image you’ll do something splashy with in Canva, and this is the image you and your audience will use to share on social media.
Now some people create different-sized images to post on different social media platforms. The advantage of doing this is that you’ll have an image that fits each platform. The downside is the time to create them if you aren’t paying for the premium account on Canva.
It’s up to you if you want to do this. I don’t currently. Maybe I should – sometimes my main image is cut off – but I haven’t invested the time or money... yet.
Pro tip: When you upload your image to your blogging platform, make sure you’ve named your image with either the title of the blog or the keyword(s) and your name or business name. This way the file name becomes another searchable piece of content for SEO.

Now you get to publish...
Can you publish now?
Well, yeah, sort of. There are a few more items you need to consider:
Do you need to turn comments on or off your post? Does it need to be reviewed by someone else before it’s published? Did you upload your thumbnail? What about an excerpt of your blog that will appear on your site?
Okay, once you have all the answers to these questions – and any other options your platform allows – hit the publish button and then do a happy dance.
Final thought:
Create a workflow for blog posting
I know, it’s a lot. Here I thought writing was the toughest part, but there are many other things to consider.
But now that you’ve done it once, it’ll be easier next time. Why?
Because you’ll take one more step by creating a workflow checklist, that’ll lay out all the steps you need to take to go from an idea to a published piece. And it won't matter if it’s the fifth time or the five hundredth time you’ve posted, you will do it with confidence that you haven’t missed anything.
Okay, folks. You’ve got the goods, now go out there and create!
Need more help with blogging? Download my Blog Writing Workbook and Checklist designed to take you from an idea to a published piece.